Almost six years ago, I came up with a variation of Frankie Brown’s ‘Ten Stitch Blanket’ pattern and posted my notes about it on Ravelry. Since then, I’ve had a TON of positive response about my work – something like 8,000 views and more than 500 “helpful” votes!
I’ve also had a fair few PM’s from folks who couldn’t quite figure out what I was talking about in terms of the (admittedly slightly weird) way I was picking up stitches. In the past I’ve just done my best to help people on an individual basis via email and PM, but I’ve finally taken some pictures of the process that I hope might help those of you who are more visual learners (I’m one of you, believe me).
So.
The way the join is written in Brown’s original pattern, it comes out looking (for me, anyway) lumpy and messy. I wasn’t happy with that – I wanted a join that laid as flat as possible while still retaining the decorative look of the join stitches sitting perpendicular to the row stitches. The way I ended up getting that to happen was via a combination of making sure the yarn was in the right place at various points in the process (which, one could argue, is really the basis of all knitting, I suppose), as well as picking the stitches up along the joining edge in a certain way.
Here is the modified pattern as I originally wrote it:
- When doing the CO, I found that the half-hitch method made it far easier later on when I had to knit into the CO edge. Long-tail made too tight of a CO edge for me. YMMV.
- All slipped stitches through the whole pattern are slipped purlwise EXCEPT when you work the K2tog for the joins.
- When you slip purlwise, keep your working yarn off to the right, slip the stitch, then make sure to return yarn to working position by bringing it around to the left and between the needles. If you just bring it to working position from the back, it will mess up the slipped-stitch ridge along the edge and you’ll get a funky, lumpy join later on. It took me about 4 tries to figure this out!
- The original pattern says to work 2 rows of straight garter on all 10 stitches between the decreases of the corners and the increases of the corners. I didn’t like the way that looked, so I omitted it completely.
CO 10 st
K 18 rows of garter, slipping first stitch of every row PURLWISE. Make sure you mark the right side of the work. This will save you much heartache later on!Work a mitered corner:
Row 1: Sl 1, K8, yfwd, sl 1 pwise, yb, turn.
Row 2: Sl 1 pwise, yb, K9.
Row 3: Sl 1, K7, yfwd, sl 1 pwise, yb, turn.
Row 4: Sl 1 pwise, yb, K8.
Row 5: Sl 1, K6, yfwd, sl 1 pwise, yb, turn.
Row 6: Sl 1 pwise, yb, K7.
Row 7: Sl 1, K5, yfwd, sl 1 pwise, yb, turn.
Row 8: Sl 1 pwise, yb, K6.
Row 9: Sl 1, K4, yfwd, sl 1 pwise, yb, turn.
Row 10: Sl 1 pwise, yb, K5.
Row 11: Sl 1, K3, yfwd, sl 1 pwise, yb, turn.
Row 12: Sl 1 pwise, yb, K4.
Row 13: Sl 1, K2, yfwd, sl 1 pwise, yb, turn.
Row 14: Sl 1 pwise, yb, K3.
Row 15: Sl 1, K1, yfwd, sl 1 pwise, yb, turn.
Row 16: Sl 1 pwise, yb, K2.
Row 17: K1, yfwd, sl 1 pwise, yb, turn.
Row 18: Sl 1 pwise, yb, K1.
Now reverse the process, working back up to 9sts, still wrapping
the st at each turn:
Row 1: Sl 1, K1, yfwd, sl 1 pwise, yb, turn.
Row 2: Sl 1 pwise, yb, K2.
Row 3: Sl 1, K2, yfwd, sl 1 pwise, yb, turn.
Row 4: Sl 1 pwise, yb, K3.
Row 5: Sl 1, K3, yfwd, sl 1 pwise, yb, turn.
Row 6: Sl 1 pwise, yb, K4.
Row 7: Sl 1, K4, yfwd, sl 1 pwise, yb, turn.
Row 8: Sl 1 pwise, yb, K5.
Row 9: Sl 1, K5, yfwd, sl 1 pwise, yb, turn.
Row 10: Sl 1 pwise, yb, K6.
Row 11: Sl 1, K6, yfwd, sl 1 pwise, yb, turn.
Row 12: Sl 1 pwise, yb, K7.
Row 13: Sl 1, K7, yfwd, sl 1 pwise, yb, turn.
Row 14: Sl 1 pwise, yb, K8.
Row 15: Sl 1, K8, yfwd, sl 1 pwise, yb, turn.
Row 16: Sl 1 pwise, yb, K9.That’s your first corner. As soon as you finish that, you immediately do the whole thing again. This is what brings the work around far enough so that you can start working down the side edge of the previous knitting.
Now you work back along the side of the original piece of knitting, joining as you go:
Row 1: Sl 1 pwise, K8, sl 1 kwise, pick up 1 st from the side of the
knitting (I went underneath the slipped stitch on the edge, YO, pull that back through to the right side), K2tog. This should give you a nice flat stitch on top of the join, and the back side of it should look clean with no lumpy bits.
Row 2: sl 1 pwise, K 9.Keep doing this until your working edge is even with the end of the previous work. Work a single mitered corner. Continue on with knitting and joining to the previous work, then working corners as necessary, to desired size.
And here is how to do the join:
(It should be noted that I knit English style, so this might be extra awkward for Continental knitters. Can’t help you there, sorry!)
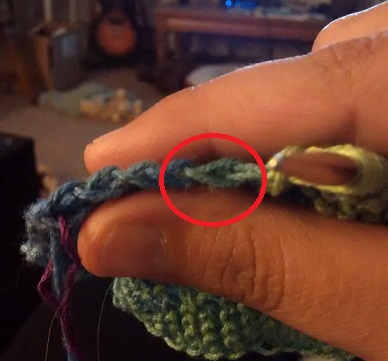
In this first picture, I’ve circled in red the stitch that we want to go under in order to pick up the new stitch:
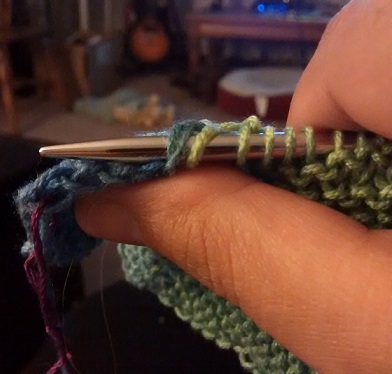
This is what it looks like when I have inserted my needle under the stitch, preparing for the YO. See how both “legs” of the blue stitch are on top of my needle? I’m not going THROUGH the stitch, but rather, under it:
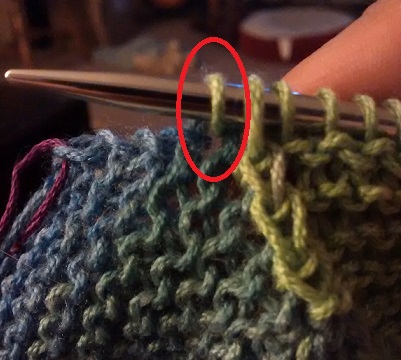
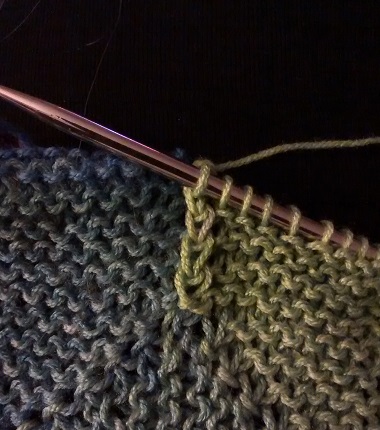
This is a shot just after I’ve done the YO and pulled the new stitch through to my working side. See how the blue stitch we went under to get this new stitch looks like a little bridge over the new green stitch? That’s what we want!
Finally, here is what it looks like after I’ve knit together the slipped stitch and the new stitch we just picked up. See how the joins lay nice and flat with no bumps sticking up? That’s the ultimate goal.
Hopefully folks find this visual aid helpful. Feel free to PM me on Rav or leave a comment here if you still need further help.

I LOVE LOVE LOVE this method. I never liked how the “other” way turned out. Thank you soooooooo much!
LikeLiked by 1 person
You’re welcome! Very glad it was helpful to you. 🙂
LikeLike
Do I have to reapeat the first 18 rows of plain knitting please
LikeLike
I’m not sure I understand the question, sorry. You knit the starter rows, then work corners to turn the work around, then you pick up stitches along the edge of the original 18 rows. Keep repeating that pattern until the blanket is the size you want.
LikeLike
Have you done the 10 stitch zigzag? Since you Kfb on the first stitch, it can’t be slipped so I’m wondering how you would go about joining. I love how this one looks!
LikeLike
I haven’t tried to tackle any of the other versions yet. Maybe some day! If you come up with a good method, definitely let me know.
LikeLike
I slip the first stitch and then do the kfb in the second stitch.
LikeLike
Thanks so much for your notes and tutorial. The first time I followed the original directions, it was a mess!! I’m on my way now!
LikeLiked by 1 person
Glad to hear it! 🙂
LikeLike
Thanks for your recap. I understand most of it. Better than the original. I have a few questions. I can get as far as the complete turn, also get how to do the turn. Question is. (When I get ready to do the corner again do I do 1 to 18 and 1 to 16 every time I do a corner. Thanks a lot for your time.
Michaela
LikeLiked by 1 person
Hi Michaela!
Rows 1-18 PLUS rows 1-16 create one full corner, so yes, every corner you come to, you need to work that whole 1-18 plus 1-16 section. If you only did 1-18, you’d end up with a working edge that looked like this: / , rather than one that looks like this: |
Hope that makes sense! 🙂
LikeLike
Thanks so much for your quick reply. Ok going to go try again. I bought all this Caron Cakes yarn and need to use it. I think this will work great.
LikeLiked by 1 person
Sorry to bother you again. I think I’m doing ok on this pattern. Would like to know how many to pick up on sides. Very pink knits says it’s a multi of 9 or do I just pick up and add stitches from the bumps. Is there a place were you should start the corner. Thanks again.
Michaela
LikeLike
Not a bother! I honestly didn’t count the number of rows I was working along each side. I just worked rows until I ran out of edge stitches to pick up, then worked a corner, and so on. A multiple of 9 would make sense, given that you start with 18 rows of garter in the very beginning. You’ll be able to tell if you’ve got it right anyway, because if you’ve either missed working a row, it’s going to look wonky when you flatten the work out and inspect it.
Hope that makes sense, and sorry I’m not a more careful counter. 😉 Let me know how you get on! I’m Ealachan on Rav.
LikeLike
Ok will look you up on Rav. I love that site. Thanks again. Going to wing it as far as the corners go.
LikeLike
I have the yarn, I have the pattern, and now I have your great tutorial to get the crisp look I’ve been wanting. Thank you for taking the time to post photos and detailed instructions. I finally think I get it!
My blanket will actually be a large wall hanging in the living room, so every stitch and lump will be on display. No pressure, lol.
LikeLiked by 1 person
I’m glad you’re finding it helpful! Would love to see a picture when you get the project finished. 🙂
LikeLike
Thank You! Thank You! – I have started this pattern so many times with different yarns but have always frogged as I hated the floppy, uneven chain join. I decided to try again and found your post on Ravelry – your join is perfect! I may finally finish this one!
LikeLiked by 1 person
Hooray! Tag me on Rav if you upload a picture of the finished piece, as I’d love to see it! 😀 So glad to have helped.
LikeLike
Hi- when I k2tog do I have to transfer the slipped stitch and the picked up stitch back onto the left needle?
LikeLike
I would like to know that question
LikeLike
Which question?
LikeLike
Hi- when I k2tog do I have to transfer the slipped stitch and the picked up stitch back onto the left needle?
LikeLike
the slipped stitch and the stitch you pick up are knitted together in the k2tog, so no, you don’t transfer anything back to the left needle at that point. That should be the last stitch of the row. You then flip the work over and work the back side as written. Does that make sense?
LikeLike
I believe you are asking if you need to move the slipped stitch and the picked up stitch back to the RH needle to knit them together. You can, but you can also just slip the LH needle under the 2 stitches on the right and K2tog thru the back loop.
LikeLike
Oh, I see what you mean now. So, the slipped stitch and the stitch you pick up are knitted together in the k2tog, so no, you don’t transfer anything back to the left needle at that point. That should be the last stitch of the row. You then flip the work over and work the back side as written. Does that make sense?
LikeLike
No I am very confused. Because if I slip one and pick up one. That takes me to the end of the row.
LikeLike
You’re knitting the slipped stitch and the picked up stitch together. That’s where the working edge joins the rest of the blanket.
LikeLike
Just wanted to thank you for this! Have been trying the 10 stitch for ages and it’s been driving me bonkers. This method is so simple and leaves everything neat (I’m a bit ocd lol)
LikeLiked by 1 person
Hi! I’ve been stopped and started a few times on the 10-stitch blanket by Frankie in crochet and knit. I got as far as joining and then got very confused. Although I learned to knit first, it’s been a while and I seem to have picked up crochet much faster. Still, I’m stubborn and want to do this project in knit. Would you be able to post a photo of your completed 10-stitch blanket. I’m curious. Thanks.
LikeLike
Hiya – are you on Ravelry? That’s the easiest way to see the pics of my finished blanket. I’m Ealachan on there, and the blanket in my projects is called the Mirtillo Blankie.
I learned crochet first, too. I picked that up as a child, but didn’t get the hang of knitting until my mid-20s. Stick with it, you’ll get it!
LikeLike
I’ve tried probably at least 20 times other methods other methods and flopped. This sounds more logical than they are. Thank you so much. I am definitely going to print this out and see what happens.
LikeLike
I hope it works for you! 😊
LikeLike
What is the meaning of your pse!!
LikeLike
Not sure what you’re referring to, sorry. If you clarify, I might be able to help.
LikeLike
Thank you for this tutorial. I’m about to start the joining bit today. You mentioned your notes in Ravelry but l can’t find you there. Have you left?
LikeLike
Nope, my user name on there is Ealachan. Although everything there is the same as what’s here, I believe.
LikeLike
I also am having trouble with the k2tog. All my stitches are now on the right needle and the yarn is in the back. Where do I insert the needle- front or back and which way do I pull the yarn?
LikeLike
I have fought with the 10 stitch blanket patterns for days and finally came upon yours and love the outcome! Have you developed a way to do the flat join?
LikeLike
Hi Cindy – glad my method helped! I haven’t done anything with the flat join, no.
LikeLike
I’m sure I’m being really thick and missing the obvious, but can you tell me what the YMMV stands for at the beginning of your instructions?
I’ve knitted several Ten Stitch and ZigZags and am always looking for another way to do the corners and joins to give the effect I’m looking for. I’ve adapted bits and pieces from other more talented knitters than me but I can’t seem to get a combination that’s right for my bizarre tastes!
Many thanks in advance. Stay safe, Mary
LikeLike
YMMV is an acronym that stands for Your Mileage May Vary. It’s just a way of saying “this works for me but it might not work for you”. 😊
LikeLike
Mega lols! 🤣🤣🤣
I knew it was an acronym but for the life of me I couldn’t work it out! I thought it might be a secret knitting code that would help me –
1. Knit quicker 2. Sew the item up for me and/or 3. Weave in my loose ends!
Do you have this code? 😂😂😂
Many thanks for your prompt reply to my inane question! Stay safe, covid is still out there! Mary x
LikeLike
Haha…no, if I had THAT code, I’d charge for it! 😉
LikeLike
So would I, Rhubarb, so would I!
If either of us find the Nirvana of knitting secrets we’ll go halves! Thanks for your help. Mary
LikeLiked by 1 person
I found the Nervous Knitter corners worked for me but struggle to get the join right. Will definitely be giving your join a try on my next project
LikeLiked by 1 person
I love your chain joins and always work them your way. However having difficulty with changing colour at mitred corner. can you help me with this please I always get a chain stitch the previous colour at the chain end once I’ve worked the mitred corner.
LikeLike
Hmm. I’ve never done one changing colors, if you can believe that! Can you send me a picture of what’s happening on yours so I can better visualize? My email is ealachan@gmail.com, or you can find me as Ealachan on Ravelry if you’re on there.
LikeLike
Hi Frances, I have only just found this method, which is working for me, yeah! I have made one colour change and there is 1 stitch of the previous colour showing. I can live with that.
LikeLike